Hey everyone, so I’ve been wanting a brick grill in my backyard for ages. Store-bought ones are okay, but they just don’t have that, you know, charm. Plus, they can be pretty pricey. I figured, why not just build one myself? I’ve seen my fair share of things gettin’ built, so this couldn’t be that hard, right?
First things first, I did a little bit of digging around to figure out what I needed. Turns out, you can use regular bricks for this, but the mortar is key. You gotta use mortar that can handle high heat, something called Sakrete makes a good one. I figured I’d need at least 100 bricks, maybe more if I wanted to get fancy with it. Also, I obviously needed a grilling set with a tray for coals and at least one grill grate. I thought, two grills, one for cooking and one for keeping stuff warm, which would be nice.


Then came the budget. I read online that a DIY brick BBQ could cost around $500 for materials, which sounded reasonable. It will depend on how big and how many features you want, I thought, I will try to keep it simple.
Getting Started
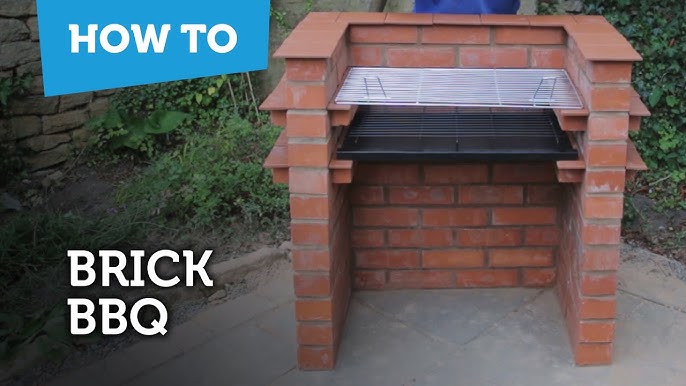
So, I cleared a spot in my backyard, leveled the ground, and laid down a concrete foundation. I’m not a pro at this, but I managed to get it pretty level. Then, I started laying the bricks. Let me tell you, this part took some time. I started with the base, then slowly built up the walls, making sure to leave space for the coal tray and the grill grates.
- First, I laid out all my tools and materials.
- Then I mixed the mortar, trying to get the right consistency.
- I carefully placed each brick, using a level to make sure everything was straight.
- I took my time, making sure each brick was secure before moving on to the next one.
The Tricky Part
The hardest part was definitely making sure the grill grates would fit properly. I had to leave gaps in the brickwork at just the right height. I measured and remeasured about a hundred times, but I think I got it right in the end. And, yeah, I did mess up a couple of times and had to redo some sections, but hey, that’s part of the learning process, right?
Finishing Up
Once the main structure was done, I let the mortar cure for a few days. Then, I added the grill grates and the coal tray. It looked pretty good, if I do say so myself! I even added a little side table area with some extra bricks, which turned out to be a great idea. I know it’s not perfect, but it’s got character, and it’s mine. It felt really good to stand back and look at what I had accomplished with my own two hands.
Finally, the moment of truth! I fired it up, threw some burgers and hot dogs on the grill, and they cooked up perfectly. The heat distribution was even, and the food tasted amazing. There’s just something special about cooking on a grill you built yourself. I’m so glad I decided to take on this project. It was a lot of work, but totally worth it. Now, I have a great spot to grill and hang out with friends and family. If you’re thinking about building your own brick grill, I say go for it! It’s a fun and rewarding project, and you’ll end up with something unique and functional.


